পাইথন এবং সাইকিট-শিখার মাধ্যমে কীভাবে স্পিচ আবেগ সনাক্তকারী করতে হবে
আবেগ স্বীকৃতিটির গুরুত্ব ব্যবহারকারীর অভিজ্ঞতা এবং ভয়েস ইউজার ইন্টারফেস (ভিইউআই) এর সাথে যুক্ত থাকার সাথে জনপ্রিয় হয়ে উঠছে । বক্তৃতাভিত্তিক সংবেদনশীলতা স্বীকৃতি সিস্টেমগুলি বিকাশে ব্যবহারিক প্রয়োগের সুবিধা রয়েছে। যাইহোক, সিস্টেমটি ব্যবহারিক প্রয়োগগুলিতে নিযুক্ত হওয়ার পরে এই সুবিধাগুলি বাস্তব-বিশ্বের পটভূমি শব্দের প্রতিবন্ধকতা সহ বক্তৃতা-ভিত্তিক আবেগ স্বীকৃতি কার্যকারিতা দ্বারা কিছুটা উপেক্ষিত হয়।
স্পিচ আবেগ রিকগনিশন (এসইআর) স্পিচ সিগন্যাল বিশ্লেষণ ডোমেনের অন্যতম চ্যালেঞ্জজনক কাজ, এটি একটি গবেষণা ক্ষেত্রের সমস্যা যা বক্তৃতার সংকেতগুলি থেকে আবেগকে অনুভব করার চেষ্টা করে।
আমরা কোথায় এটি ব্যবহার করতে পারি?
যদিও এটি তত জনপ্রিয় নয়, এসইআর এই বছরগুলিতে এতগুলি অঞ্চলে প্রবেশ করেছে:
- চিকিত্সা ক্ষেত্র: টেলিমেডিসিন বিশ্বে যেখানে রোগীদের মোবাইল প্ল্যাটফর্মের মাধ্যমে মূল্যায়ন করা হয়, সেখানে চিকিত্সা পেশাদারের জন্য রোগী আসলে কী অনুভব করছেন তা নির্ধারণের দক্ষতা নিরাময় প্রক্রিয়াতে কার্যকর হতে পারে।
- গ্রাহক পরিষেবা: কল সেন্টারে কথোপকথনটি গ্রাহকদের সাথে কল পরিচারকদের আচরণগত অধ্যয়নের বিশ্লেষণ করতে ব্যবহার করা যেতে পারে যা পরিষেবার মানের উন্নতি করতে সহায়তা করে।
- সুপারিশকারী সিস্টেমগুলি: সি সেই পণ্যটির প্রতি তাদের আবেগের উপর ভিত্তি করে গ্রাহকদের কাছে পণ্য সুপারিশ করতে কার্যকর হবে।
ঠিক আছে, এখন যথেষ্ট তত্ত্ব, আসুন শুরু করা যাক!
প্রয়োজনীয় নির্ভরতা
প্রথমত, আমাদের পাইপ ব্যবহার করে কিছু নির্ভরতা ইনস্টল করতে হবে:
পাইপ 3 ইনস্টল করুন লাইব্রোসা == 0.6.3 নাম্বার সাউন্ডফিল == 0.9.0 স্কলারন প্যাডিয়ো == 0.2.11
আসুন সেগুলি আমদানি করুন:
import soundfile # to read audio file
import numpy as np
import librosa # to extract speech features
import glob
import os
import pickle # to save model after training
from sklearn.model_selection import train_test_split # for splitting training and testing
from sklearn.neural_network import MLPClassifier # multi-layer perceptron model
from sklearn.metrics import accuracy_score # to measure how good we are
পুরো পাইপলাইনটি নিম্নরূপ (যেকোন মেশিন লার্নিং পাইপলাইনের মতো):
- ডেটাসেট প্রস্তুত করা হচ্ছে : এখানে, আমরা নিষ্কাশনের জন্য উপযোগী করতে ডেটাসেটটি ডাউনলোড এবং রূপান্তর করি।
- লোড করা হচ্ছে ডেটা সেটটি এই প্রক্রিয়া যেমন যেমন শক্তি, পিচ এবং কন্ঠনালী কনফিগারেশন বক্তৃতা সংকেত থেকে বিভিন্ন বৈশিষ্ট্য প্রাপ্তির হিসাবে পাইথন মধ্যে ডেটা সেটটি লোড যা অডিও বৈশিষ্ট্য আহরণের জড়িত, সম্পর্কে।
- মডেলটিকে প্রশিক্ষণ দিন : আমরা ডেটাসেট প্রস্তুত ও লোড করার পরে, আমরা এটি কেবল উপযুক্ত স্কেলার্ন মডেলটিতে প্রশিক্ষণ করি ।
- মডেলটির পরীক্ষা : আমাদের মডেল কতটা ভাল করছে তা পরিমাপ করছে।
প্রথমে, আমাদের প্রশিক্ষণের জন্য একটি ডেটাসেটের দরকার আছে, ভাগ্যক্রমে সেখানে রেভ্যাস ডেটাসেট রয়েছে , আমি এটি ডাউনলোড করেছি এবং এটি সফলভাবে বের করেছি। এর পরে আমাদের সকল অডিও ফাইলের নমুনার হার কমিয়ে আনতে হবে যাতে লাইব্রোসা খুশি হবে, আমি এটি করার জন্য একটি স্ক্রিপ্ট তৈরি করেছি, আপনি যদি ধাপে ধাপে অনুসরণ করছেন তবে আপনার আসলে এটির দরকার নেই, কারণ আমি ইতিমধ্যে প্রস্তুত করেছি ডেটাসেট ( এখানে ডাউনলোড করুন )।
দ্রষ্টব্য: আপনি যদি নিজের নিজস্ব অডিও নমুনাগুলিকে 16000Hz নমুনা হার এবং মনো চ্যানেলে প্রস্তাবিত রূপান্তর করতে চান তবে আপনার মেশিনে এই পাইথন স্ক্রিপ্ট এবং ffmpeg ইনস্টল করা দরকার।
আসুন আমরা ফাংশনটি তৈরি করি যা উত্তোলনের বৈশিষ্ট্যগুলি পরিচালনা করে (যা স্পিচ ওয়েভফর্মকে তুলনামূলকভাবে কম ডেটার রেটে প্যারাম্যাট্রিক উপস্থাপনের আকারে পরিবর্তন করে):
def extract_feature(file_name, **kwargs):
    """
    Extract feature from audio file `file_name`
        Features supported:
            - MFCC (mfcc)
            - Chroma (chroma)
            - MEL Spectrogram Frequency (mel)
            - Contrast (contrast)
            - Tonnetz (tonnetz)
        e.g:
        `features = extract_feature(path, mel=True, mfcc=True)`
    """
    mfcc = kwargs.get("mfcc")
    chroma = kwargs.get("chroma")
    mel = kwargs.get("mel")
    contrast = kwargs.get("contrast")
    tonnetz = kwargs.get("tonnetz")
    with soundfile.SoundFile(file_name) as sound_file:
        X = sound_file.read(dtype="float32")
        sample_rate = sound_file.samplerate
        if chroma or contrast:
            stft = np.abs(librosa.stft(X))
        result = np.array([])
        if mfcc:
            mfccs = np.mean(librosa.feature.mfcc(y=X, sr=sample_rate, n_mfcc=40).T, axis=0)
            result = np.hstack((result, mfccs))
        if chroma:
            chroma = np.mean(librosa.feature.chroma_stft(S=stft, sr=sample_rate).T,axis=0)
            result = np.hstack((result, chroma))
        if mel:
            mel = np.mean(librosa.feature.melspectrogram(X, sr=sample_rate).T,axis=0)
            result = np.hstack((result, mel))
        if contrast:
            contrast = np.mean(librosa.feature.spectral_contrast(S=stft, sr=sample_rate).T,axis=0)
            result = np.hstack((result, contrast))
        if tonnetz:
            tonnetz = np.mean(librosa.feature.tonnetz(y=librosa.effects.harmonic(X), sr=sample_rate).T,axis=0)
            result = np.hstack((result, tonnetz))
    return result
আমরা এমএফসিসি , ক্রোমা এবং মেল ফ্রিকোয়েন্সি সিপস্ট্রামকে কাঁচা তরঙ্গরূপের পরিবর্তে স্পিচ বৈশিষ্ট্য হিসাবে ব্যবহার করব যার মধ্যে অপ্রয়োজনীয় তথ্য থাকতে পারে যা শ্রেণিবদ্ধকরণে সহায়তা করে না।
আমাদের থাকা ডেটা লোড করতে ফাংশনটি লিখি:
# all emotions on RAVDESS dataset
int2emotion = {
    "01": "neutral",
    "02": "calm",
    "03": "happy",
    "04": "sad",
    "05": "angry",
    "06": "fearful",
    "07": "disgust",
    "08": "surprised"
}

# we allow only these emotions ( feel free to tune this on your need )
AVAILABLE_EMOTIONS = {
    "angry",
    "sad",
    "neutral",
    "happy"
}

def load_data(test_size=0.2):
    X, y = [], []
    for file in glob.glob("data/Actor_*/*.wav"):
        # get the base name of the audio file
        basename = os.path.basename(file)
        # get the emotion label
        emotion = int2emotion[basename.split("-")[2]]
        # we allow only AVAILABLE_EMOTIONS we set
        if emotion not in AVAILABLE_EMOTIONS:
            continue
        # extract speech features
        features = extract_feature(file, mfcc=True, chroma=True, mel=True)
        # add to data
        X.append(features)
        y.append(emotion)
    # split the data to training and testing and return it
    return train_test_split(np.array(X), y, test_size=test_size, random_state=7)
দ্রষ্টব্য: "ডেটা" নামে একটি ফোল্ডার একই ডিরেক্টরিতে উপস্থিত থাকতে হবে ( এখানে ডাউনলোড করুন ), অন্যথায় এটি কাজ করবে না।
আসুন এটি আসলে লোড করুন:
# load RAVDESS dataset, 75% training 25% testing
X_train, X_test, y_train, y_test = load_data(test_size=0.25)
ডেটাসেট সম্পর্কে কিছু তথ্য লগইন করা হচ্ছে:
# print some details
# number of samples in training data
print("[+] Number of training samples:", X_train.shape[0])
# number of samples in testing data
print("[+] Number of testing samples:", X_test.shape[0])
# number of features used
# this is a vector of features extracted
# using extract_features() function
print("[+] Number of features:", X_train.shape[1])
সর্বোত্তম সম্ভাব্য হাইপার প্যারামিটারগুলি পাওয়ার জন্য আমি এমএলপি ক্লাসিফায়ারে গ্রিড অনুসন্ধান করার পরে , আমি এই প্যারামিটারগুলি নিয়ে এসেছি (এখন পর্যন্ত), আসুন এটি সরাসরি ব্যবহার করুন:
# best model, determined by a grid search
model_params = {
    'alpha': 0.01,
    'batch_size': 256,
    'epsilon': 1e-08,
    'hidden_layer_sizes': (300,),
    'learning_rate': 'adaptive',
    'max_iter': 500,
}
সুতরাং, এটি মূলত একটি পূর্ণ-সংযুক্ত (ঘন) নিউরাল নেটওয়ার্ক যার একটি স্তর রয়েছে যার মধ্যে একটি স্তর রয়েছে 300 ইউনিট, 256, 500 পুনরাবৃত্তির একটি ব্যাচের আকার এবং একটি অভিযোজিত শিক্ষার হার (এটি অনুকূল হাইপারপ্যারামিটার নয়, তাই ঝাঁকুনির জন্য নির্দ্বিধায় অনুভব করুন।) ।
এবার এই পরামিতিগুলির সাহায্যে মডেলটি আরম্ভ করব:
# initialize Multi Layer Perceptron classifier
# with best parameters ( so far )
model = MLPClassifier(**model_params)
আমাদের এখন কেবলমাত্র আমরা লোড করা ডেটাসেটের সাহায্যে মডেলটিকে প্রশিক্ষণ দিতে হবে:
# train the model
print("[*] Training the model...")
model.fit(X_train, y_train)
এটি শেষ হতে কয়েক সেকেন্ড সময় লাগবে, তারপরে আমাদের যথার্থ স্কোর গণনা করতে হবে এবং আমরা কতটা ভাল তা পরিমাপ করতে এটি মুদ্রণ করতে হবে:
# predict 25% of data to measure how good we are
y_pred = model.predict(X_test)

# calculate the accuracy
accuracy = accuracy_score(y_true=y_test, y_pred=y_pred)

print("Accuracy: {:.2f}%".format(accuracy*100))
মডেল সংরক্ষণ করা:
# now we save the model
# make result directory if doesn't exist yet
if not os.path.isdir("result"):
    os.mkdir("result")

pickle.dump(model, open("result/mlp_classifier.model", "wb"))
এখানে আমার ফলাফলের একটি স্ক্রিনশট রয়েছে:
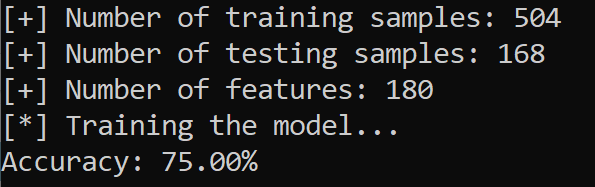
ওটা দারুন! আমরা মাত্র কয়েকটি প্রশিক্ষণের নমুনা ব্যবহার করে 4 টি আবেগের 75% নির্ভুলতা অর্জন করেছি, ইমো-ডিবি এবং টিএসএসের মতো অন্যান্য ডেটাসেটগুলি ব্যবহার এবং একীভূত করতে এবং আপনি আরও ভাল পারফরম্যান্স পেতে ইচ্ছুক হিসাবে মডেলটিকে (বা অন্য একটি ব্যবহার করুন) সামঞ্জস্য করতে পারেন।
আপনি যদি এই মডেলটিতে আপনার ভয়েস সুরটি পরীক্ষা করতে চান তবে এই ফাইলটিতে যান ।
এখানে প্রদর্শিত সমস্ত কোড এই গিথুব সংগ্রহস্থলে রয়েছে । একটি তারকা ছেড়ে নির্দ্বিধায়!
এছাড়াও, আমি একটি পৃথক সংগ্রহস্থল তৈরি করেছি যা এই পুরো প্রক্রিয়াটিকে খুব সহজ করে তোলে! এটি এখানে দেখুন , এটি আরও ভাল পারফরম্যান্সের জন্য ডিপ লার্নিং ব্যবহার করে! একটি তারকা ছেড়ে নির্দ্বিধায়!
Code for How to Make a Speech Emotion Recognizer Using Python And Scikit-learn
You can also view the full code on github.
utils.py
import soundfile
import numpy as np
import librosa
import glob
import os
from sklearn.model_selection import train_test_split

# all emotions on RAVDESS dataset
int2emotion = {
    "01": "neutral",
    "02": "calm",
    "03": "happy",
    "04": "sad",
    "05": "angry",
    "06": "fearful",
    "07": "disgust",
    "08": "surprised"
}

# we allow only these emotions
AVAILABLE_EMOTIONS = {
    "angry",
    "sad",
    "neutral",
    "happy"
}

def extract_feature(file_name, **kwargs):
    """
    Extract feature from audio file `file_name`
        Features supported:
            - MFCC (mfcc)
            - Chroma (chroma)
            - MEL Spectrogram Frequency (mel)
            - Contrast (contrast)
            - Tonnetz (tonnetz)
        e.g:
        `features = extract_feature(path, mel=True, mfcc=True)`
    """
    mfcc = kwargs.get("mfcc")
    chroma = kwargs.get("chroma")
    mel = kwargs.get("mel")
    contrast = kwargs.get("contrast")
    tonnetz = kwargs.get("tonnetz")
    with soundfile.SoundFile(file_name) as sound_file:
        X = sound_file.read(dtype="float32")
        sample_rate = sound_file.samplerate
        if chroma or contrast:
            stft = np.abs(librosa.stft(X))
        result = np.array([])
        if mfcc:
            mfccs = np.mean(librosa.feature.mfcc(y=X, sr=sample_rate, n_mfcc=40).T, axis=0)
            result = np.hstack((result, mfccs))
        if chroma:
            chroma = np.mean(librosa.feature.chroma_stft(S=stft, sr=sample_rate).T,axis=0)
            result = np.hstack((result, chroma))
        if mel:
            mel = np.mean(librosa.feature.melspectrogram(X, sr=sample_rate).T,axis=0)
            result = np.hstack((result, mel))
        if contrast:
            contrast = np.mean(librosa.feature.spectral_contrast(S=stft, sr=sample_rate).T,axis=0)
            result = np.hstack((result, contrast))
        if tonnetz:
            tonnetz = np.mean(librosa.feature.tonnetz(y=librosa.effects.harmonic(X), sr=sample_rate).T,axis=0)
            result = np.hstack((result, tonnetz))
    return result


def load_data(test_size=0.2):
    X, y = [], []
    for file in glob.glob("data/Actor_*/*.wav"):
        # get the base name of the audio file
        basename = os.path.basename(file)
        # get the emotion label
        emotion = int2emotion[basename.split("-")[2]]
        # we allow only AVAILABLE_EMOTIONS we set
        if emotion not in AVAILABLE_EMOTIONS:
            continue
        # extract speech features
        features = extract_feature(file, mfcc=True, chroma=True, mel=True)
        # add to data
        X.append(features)
        y.append(emotion)
    # split the data to training and testing and return it
    return train_test_split(np.array(X), y, test_size=test_size, random_state=7)
ser.py
from sklearn.neural_network import MLPClassifier

from sklearn.metrics import accuracy_score
from utils import load_data

import os
import pickle

# load RAVDESS dataset
X_train, X_test, y_train, y_test = load_data(test_size=0.25)
# print some details
# number of samples in training data
print("[+] Number of training samples:", X_train.shape[0])
# number of samples in testing data
print("[+] Number of testing samples:", X_test.shape[0])
# number of features used
# this is a vector of features extracted
# using utils.extract_features() method
print("[+] Number of features:", X_train.shape[1])
# best model, determined by a grid search
model_params = {
    'alpha': 0.01,
    'batch_size': 256,
    'epsilon': 1e-08,
    'hidden_layer_sizes': (300,),
    'learning_rate': 'adaptive',
    'max_iter': 500,
}
# initialize Multi Layer Perceptron classifier
# with best parameters ( so far )
model = MLPClassifier(**model_params)

# train the model
print("[*] Training the model...")
model.fit(X_train, y_train)

# predict 25% of data to measure how good we are
y_pred = model.predict(X_test)

# calculate the accuracy
accuracy = accuracy_score(y_true=y_test, y_pred=y_pred)

print("Accuracy: {:.2f}%".format(accuracy*100))

# now we save the model
# make result directory if doesn't exist yet
if not os.path.isdir("result"):
    os.mkdir("result")

pickle.dump(model, open("result/mlp_classifier.model", "wb"))
test.py
import pyaudio
import os
import wave
import pickle
from sys import byteorder
from array import array
from struct import pack
from sklearn.neural_network import MLPClassifier

from utils import extract_feature

THRESHOLD = 500
CHUNK_SIZE = 1024
FORMAT = pyaudio.paInt16
RATE = 16000

SILENCE = 30

def is_silent(snd_data):
    "Returns 'True' if below the 'silent' threshold"
    return max(snd_data) < THRESHOLD

def normalize(snd_data):
    "Average the volume out"
    MAXIMUM = 16384
    times = float(MAXIMUM)/max(abs(i) for i in snd_data)

    r = array('h')
    for i in snd_data:
        r.append(int(i*times))
    return r

def trim(snd_data):
    "Trim the blank spots at the start and end"
    def _trim(snd_data):
        snd_started = False
        r = array('h')

        for i in snd_data:
            if not snd_started and abs(i)>THRESHOLD:
                snd_started = True
                r.append(i)

            elif snd_started:
                r.append(i)
        return r

    # Trim to the left
    snd_data = _trim(snd_data)

    # Trim to the right
    snd_data.reverse()
    snd_data = _trim(snd_data)
    snd_data.reverse()
    return snd_data

def add_silence(snd_data, seconds):
    "Add silence to the start and end of 'snd_data' of length 'seconds' (float)"
    r = array('h', [0 for i in range(int(seconds*RATE))])
    r.extend(snd_data)
    r.extend([0 for i in range(int(seconds*RATE))])
    return r

def record():
    """
    Record a word or words from the microphone and
    return the data as an array of signed shorts.
    Normalizes the audio, trims silence from the
    start and end, and pads with 0.5 seconds of
    blank sound to make sure VLC et al can play
    it without getting chopped off.
    """
    p = pyaudio.PyAudio()
    stream = p.open(format=FORMAT, channels=1, rate=RATE,
        input=True, output=True,
        frames_per_buffer=CHUNK_SIZE)

    num_silent = 0
    snd_started = False

    r = array('h')

    while 1:
        # little endian, signed short
        snd_data = array('h', stream.read(CHUNK_SIZE))
        if byteorder == 'big':
            snd_data.byteswap()
        r.extend(snd_data)

        silent = is_silent(snd_data)

        if silent and snd_started:
            num_silent += 1
        elif not silent and not snd_started:
            snd_started = True

        if snd_started and num_silent > SILENCE:
            break

    sample_width = p.get_sample_size(FORMAT)
    stream.stop_stream()
    stream.close()
    p.terminate()

    r = normalize(r)
    r = trim(r)
    r = add_silence(r, 0.5)
    return sample_width, r

def record_to_file(path):
    "Records from the microphone and outputs the resulting data to 'path'"
    sample_width, data = record()
    data = pack('<' + ('h'*len(data)), *data)

    wf = wave.open(path, 'wb')
    wf.setnchannels(1)
    wf.setsampwidth(sample_width)
    wf.setframerate(RATE)
    wf.writeframes(data)
    wf.close()


if __name__ == "__main__":
    # load the saved model (after training)
    model = pickle.load(open("result/mlp_classifier.model", "rb"))
    print("Please talk")
    filename = "test.wav"
    # record the file (start talking)
    record_to_file(filename)
    # extract features and reshape it
    features = extract_feature(filename, mfcc=True, chroma=True, mel=True).reshape(1, -1)
    # predict
    result = model.predict(features)[0]
    # show the result !
    print("result:", result)
convert_wavs.py
"""
A utility script used for converting audio samples to be
suitable for feature extraction
"""

import os

def convert_audio(audio_path, target_path, remove=False):
    """This function sets the audio `audio_path` to:
        - 16000Hz Sampling rate
        - one audio channel ( mono )
            Params:
                audio_path (str): the path of audio wav file you want to convert
                target_path (str): target path to save your new converted wav file
                remove (bool): whether to remove the old file after converting
        Note that this function requires ffmpeg installed in your system."""

    os.system(f"ffmpeg -i {audio_path} -ac 1 -ar 16000 {target_path}")
    # os.system(f"ffmpeg -i {audio_path} -ac 1 {target_path}")
    if remove:
        os.remove(audio_path)


def convert_audios(path, target_path, remove=False):
    """Converts a path of wav files to:
        - 16000Hz Sampling rate
        - one audio channel ( mono )
        and then put them into a new folder called `target_path`
            Params:
                audio_path (str): the path of audio wav file you want to convert
                target_path (str): target path to save your new converted wav file
                remove (bool): whether to remove the old file after converting
        Note that this function requires ffmpeg installed in your system."""

    for dirpath, dirnames, filenames in os.walk(path):
        for dirname in dirnames:
            dirname = os.path.join(dirpath, dirname)
            target_dir = dirname.replace(path, target_path)
            if not os.path.isdir(target_dir):
                os.mkdir(target_dir)

    for dirpath, _, filenames in os.walk(path):
        for filename in filenames:
            file = os.path.join(dirpath, filename)
            if file.endswith(".wav"):
                # it is a wav file
                target_file = file.replace(path, target_path)
                convert_audio(file, target_file, remove=remove)


if __name__ == "__main__":
    import argparse
    parser = argparse.ArgumentParser(description="""Convert ( compress ) wav files to 16MHz and mono audio channel ( 1 channel )
                                                    This utility helps for compressing wav files for training and testing""")
    parser.add_argument("audio_path", help="Folder that contains wav files you want to convert")
    parser.add_argument("target_path", help="Folder to save new wav files")
    parser.add_argument("-r", "--remove", type=bool, help="Whether to remove the old wav file after converting", default=False)

    args = parser.parse_args()
    audio_path = args.audio_path
    target_path = args.target_path

    if os.path.isdir(audio_path):
        if not os.path.isdir(target_path):
            os.makedirs(target_path)
            convert_audios(audio_path, target_path, remove=args.remove)
    elif os.path.isfile(audio_path) and audio_path.endswith(".wav"):
        if not target_path.endswith(".wav"):
            target_path += ".wav"
        convert_audio(audio_path, target_path, remove=args.remove)
    else:
        raise TypeError("The audio_path file you specified isn't appropriate for this operation")
0 comments:
Post a Comment